MIMMS Principles

Warning

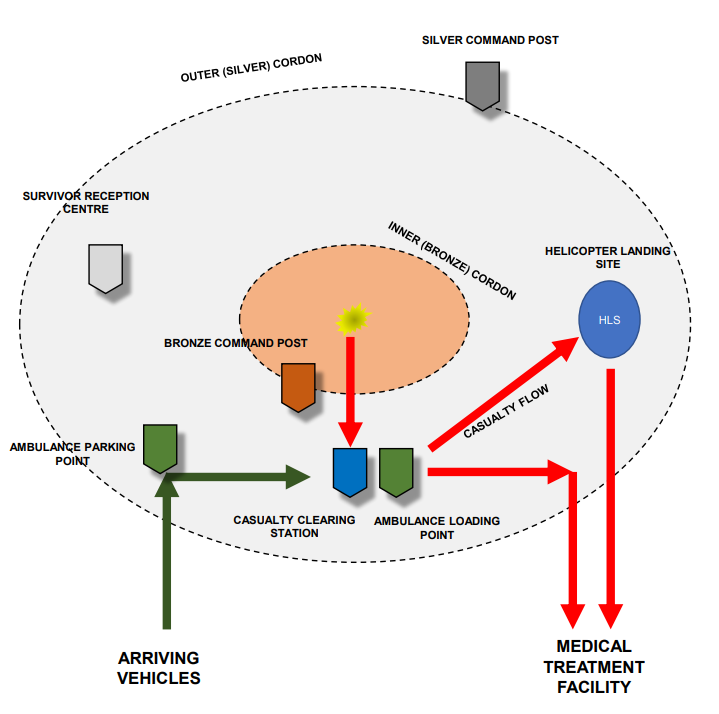
Key Locations

SILVER (OUTER) CORDON
• The 'warm' zone that defines the safe boundary within which activity
supporting the incident is managed.

SILVER COMMAND POST
• The command and control point for all activity within the Silver cordon.

BRONZE (INNER) CORDON
• Referred to as the ‘hot' zone. It is a high threat environment that requires
expert risk assessment.

BRONZE SECTORS
• The Bronze cordon may be divided into sectors to improve control.

BRONZE COMMAND POST
• The incident command and control point for all Bronze Commanders.

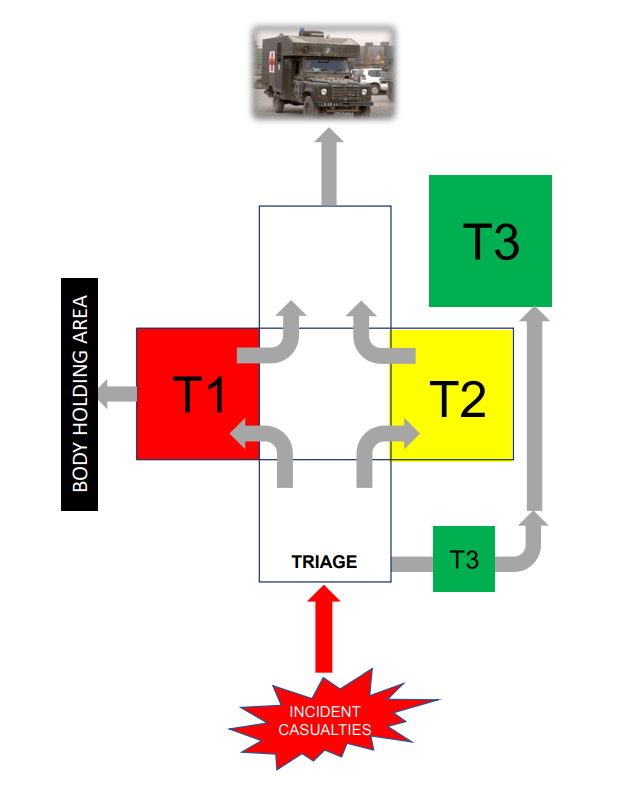
CASUALTY CLEARING STATION
• A temporary medical treatment facility that provides life saving medial treatment
prior to evacuation to definitive medical care.

SURVIVOR RECEPTION CENTRE
• A location within the Silver cordon where personnel with no obvious or very minor
injuries are managed.

AMBULANCE PARKING POINT
• The location where vehicles required for casualty evacuation are parked.

CASUALTY LOADING POINT
• Located at the rear of the Casualty Clearing Station. Casualties are loaded onto
suitable transport for evacuation to definitive medical care.

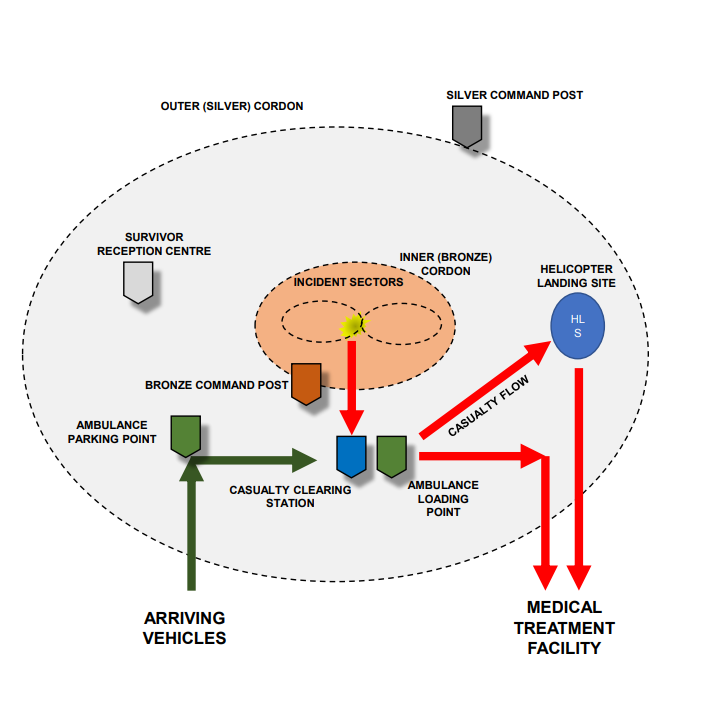
Major Incident Layout

Key locations can be seen in schematic view here

Key Roles

SILVER COMMANDER (SC)
• Responsible for command and control of the response within the Silver cordon.
Coordinates assets and resources in support of the medical response. Liaises with
the strategic (Gold) Commander.

SILVER MEDICAL COMMANDER (SMC)
• Responsible for command and control of all medial assets at the scene.
Coordinates triage, treatment and transport of casualties to definitive medical care.

BRONZE COMMANDER (BC)
• Responsible for command and control within the Bronze cordon. Liaises with the
Bronze Medical Commander and directly with the Silver Commander.

BRONZE MEDICAL COMMANDER (BMC)
• Responsible for command and control of all medical assets within the Bronze
cordon. Liaises with the Bronze Commander and Silver Medical Commander.

PRIMARY TRIAGE OFFICER (PTO)
• Manages the triage of casualties within the Bronze cordon.

CASUALTY CLEARING OFFICER (CCO)
• Responsible for the command and control of medical assets within the CCS.
Coordinates the secondary triage, treatment and transport of casualties. Liaises
directly with the Silver Medical Commander, the Bronze Medical Commander and
the Casualty Loading Officer

MEDICAL TEAM LEADER
• The senior clinician within the CCS responsible for coordinating the medical care
of casualties within the CCS.

SECONDARY TRIAGE OFFICER (STO)
• Triages and logs casualties on arrival at the CCS.

CASUALTY LOADING OFFICER (CLO)
• Responsible for coordinating the safe transport of casualties to appropriate
definitive medical care. Liaises with the CCO and SMC.

AMBULANCE PARKING OFFICER (APO)
• Controls and coordinates the movement of all evacuation platforms within the
Silver cordon.

Command and Control

COMMAND

  • Command is organised in three tiers.
    • GOLD – Not at the incident but in a control room or strategic
      headquarters, supporting the incident as well as other operations
      within the AOR.
    • SILVER - Overall Command of operations within the Silver Cordon,
      supporting operations within Bronze, liaising with strategic or 'Gold'
      command.
    • BRONZE – Command of operations within the Bronze Cordon.

Command moves vertically between the tiers with defined command
functions within each tier.

Within each tier, there will be Commanders with differing skill sets
(Medical, Force Protection etc.); these commanders must Co-locate,
Coordinate and Communicate together to jointly understand the risk
and share situational awareness (see JESIP).


MEDICAL COMMAND

  • Medical command focuses on managing the medical assets at the
    incident. It coordinates the triage, treatment and evacuation of the
    casualties to definitive medical care.
  • Medical command is organised within the command tiers. See the
    aide memoir for further detail.


CONTROL

  • During the initial stage of an incident the 4 C''s (see Aide Memoir)
    CONFIRM, CLEAR, CORDON, CONTROL are used.
  • Control is achieved by the establishment of a Bronze and Silver
    cordon.
  • Control of the BRONZE cordon is the responsibility of the Bronze
    Commander. However, an “all hazards” approach may require initial
    control and risk assessment by a subject matter expert such as a
    bomb disposal expert.
  • A large Bronze cordon may require the use of sectors to improve
    control within the cordon.
  • The Silver Commander is responsible for the control and coordination
    of all assets within the SILVER cordon in order to optimise the major
    incident response.
  • The Silver Medical Commander is in control of the medical assets on
    scene and is responsible for coordinating the medical response.

Safety

Safety is organised using the following approach:
SELF – SCENE – SURVIVORS

Self

The tactical situation will dictate safety measures required by the individual. This can involve using military skills and tactics and selection of appropriate PPE such as body armour, helmets, gloves etc.

In a permissive (safe) environment appropriate PPE will be dictated by the location, for example at the CCS PPE would include masks, gloves and aprons.

Scene

The nature of the incident will dictate safety measures required to mitigate any hazards, such as EOD teams to deal with unexploded ordnance, firefighting teams to deal with fires, force protection/QRF to deal with hostile action, Engineers to deal with unstable structures etc.

If HAZMAT/CBRN is present, then special measures will be required.

Survivors

Survivors will need to be managed, particularly if there is a threat from hostile action, the weather, secondary devices or additional hazards.

For further details on managing safety, refer to the Aide Memoire

Communication

Communications between the key command roles and locations within a major incident must be effectively established using the most appropriate available means.

Options available include;

  • FACE TO FACE
  • RADIO
  • LANDLINE
  • RUNNERS
  • TANNOY
  • LOUDSPEAKER
  • HAND SIGNALS

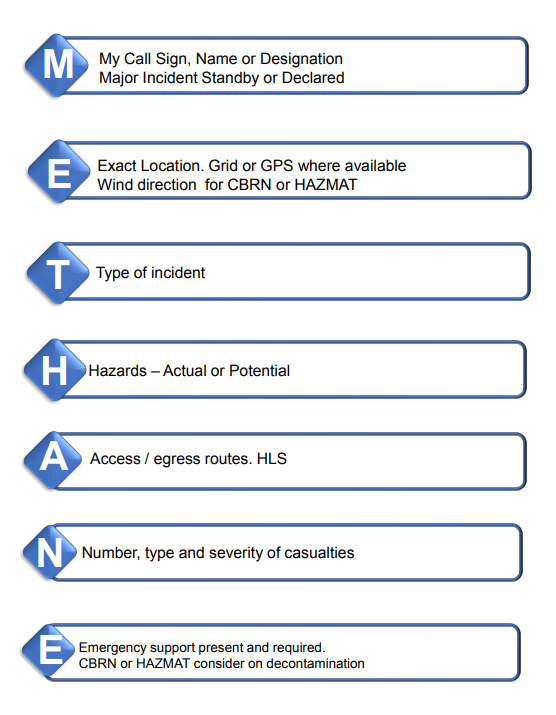
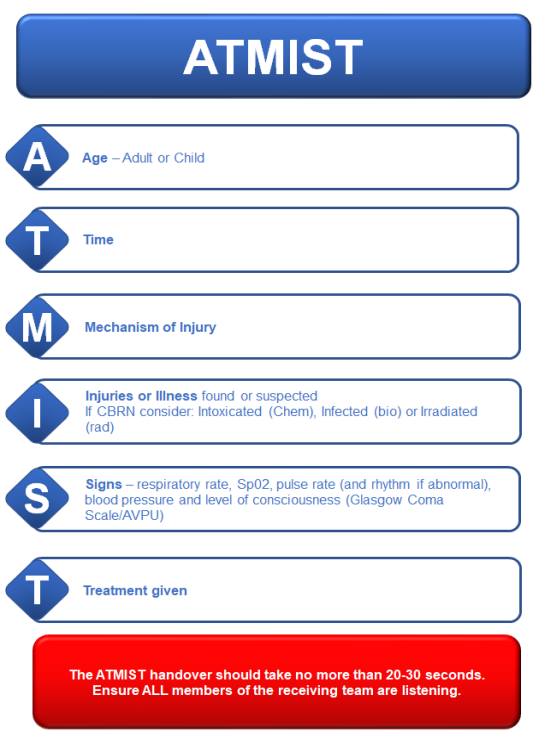
The use of universal message structures such as METHANE and ATMIST are vital for communications to be effective.

All communications must be logged. (See reference section)


The JESIP principles

Co-locate, Coordinate, Communicate, Joint Understanding of risk and Shared situational awareness will improve communication between Commanders at the scene.

Further information on these JESIP principles can be found in the reference section


COMMUNICATION FORMATS

My Call Sign, Name or Designation

M Major Incident Standby or Declared

E Exact Location. Grid or GPS where available

T Type of incident.  Wind direction for CBRN or HAZMAT

H Hazards – Actual or Potential

A Access / egress routes. HLS

N Number, type and severity of casualties

E Emergency support present and required.
CBRN or HAZMAT consider on decontamination

Assessment

Early scene assessment is vital on order to establish the magnitude of the incident and the resources required to respond to the situation.

Assessment is a dynamic process and should be conducted regularly to maintain situational awareness and refine the response plan.

The initial assessment is usually conducted by the first on scene.

Subsequent assessments are conducted by key commanders at the scene, typically the:

  • Silver Commander
  • Silver Medical Commander,
  • Bronze Commander
  • Bronze Medical Commander.

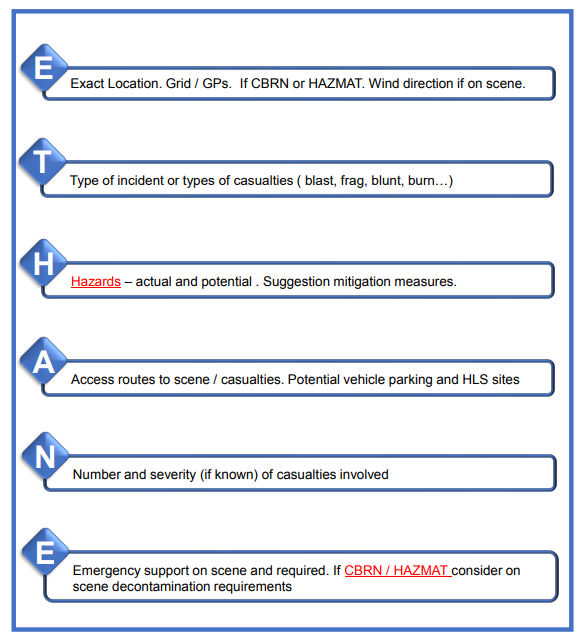
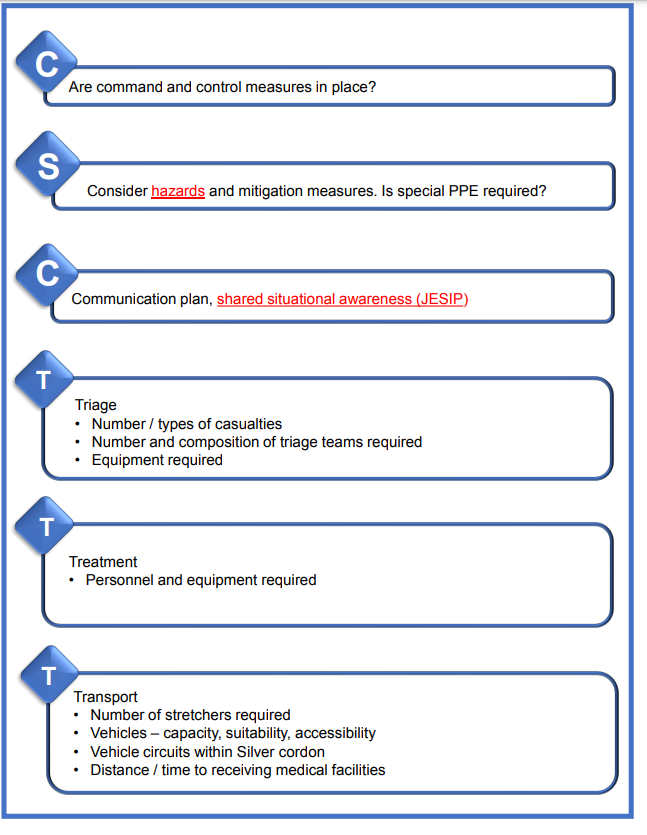
Assessment tools such as ETHANE for an initial assessment and CSCATTT for a detailed assessment reduce the likelihood that key information is overlooked.

See the Aide Memoire in the reference section for a more detailed description.


INITIAL SCENE ASSESSMENT

E - Exact Location. Grid / GPs. If CBRN or HAZMAT. Wind direction if on scene.
T - Type of incident or types of casualties ( blast, frag, blunt, burn…)
H - Hazards – actual and potential . Suggestion mitigation measures.
A - Access routes to scene / casualties. Potential vehicle parking and HLS sites
N - Number and severity (if known) of casualties involved
E - Emergency support on scene and required. If CBRN / HAZMAT consider on scene decontamination requirements


GENERAL SCENE ASSESSMENT

  • C - Are command and control measures in place?
  • S - Consider hazards and mitigation measures. Is special PPE required?
  • C - Communication plan, shared situational awareness (JESIP)
  • T - Triage
    • Number / types of casualties
    • Number and composition of triage teams required
    • Equipment required
  • T - Treatment
    • Personnel and equipment required
  • T - Transport
    • Number of stretchers required
    • Vehicles – capacity, suitability, accessibility
    • Vehicle circuits within Silver cordon
    • Distance / time to receiving medical facilities


BRIEFING FOR DUTY

❑ Ground layout ( sketch where possible)
❑ Situational brief - what has happened
❑ Confirm chain of command (C2)
❑ Confirm tasks and sub-tasks
❑ Identify hazards, access and egress points,
evacuation procedure, PPE required
❑ Additional equipment required
❑ Communication plan
❑ Assessment – consider the medical resources
and infrastructure required (if relevant to task)
❑ Triage system (if relevant to task)
❑ Treatment plan (if relevant to task)
❑ Reporting procedure - who, when, where

Triage

• Triage prioritises casualty evacuation from the point of injury and
treatment at the casualty clearing station (CCS). It identifies those
casualties that require life saving interventions and prioritises their
care.
• The choice of appropriate triage system is critical in ensuring the right
casualty receives the right treatment at right time.
• Once the Bronze cordon area has been made safe, the Primary Triage
Officer coordinates triage of all the casualties within the cordon.
• Secondary triage is carried out on arrival at the casualty clearing
station by the Secondary Triage Officer using an appropriate triage
method and clinical judgement.
• The toolboxes contains the triage sieve and triage sort algorithms.
• Paediatric casualties will be over triaged using the adult triage sieve
and sort algorithms. A paediatric triage tool such as the paediatric
triage tape should be used.
• Detailed information about triage can be found in the Aide memoire.

Treatment

The availability of medical personnel, equipment and local
infrastructure may place constraints on the level of treatment that can
be delivered to casualties at the scene of a major incident.
• At the point of injury, (during the initial triage) treatment is focused on
control of catastrophic bleeding and airway opening manouevres.
Advanced treatment may be provided in very specific circumstances
such as casualty entrapment.
• The Casualty Collection Station (CCS) is located using CCS siting
tool. It should be laid out to optimise casualty treatment and flow
through the facility.
• The Secondary Triage Officer (STO) will re-triage all casualties at the
entrance to the CCS to determine their treatment priority.
• Medical treatment teams will deliver the medical care necessary to
stabilise and sustain the casualties for evacuation to an appropriate
medical treatment facility.
• Treatment will be overseen by the medical team leader(s) in
accordance with CGOs treatment guidelines.

• Follow the links below to CGOs for guidance on specific
treatments or care pathways
• Catastrophic haemorrhage management
• C- spine management
• Airway management
• Breathing management
• Circulation management
• Splintage and fracture management
• Therapeutic management
• Amputation
• Pelvic fracture
• Fragmentation injury
• Blast injury
• Blunt trauma
• Chemical / biological exposure

Transport

• An efficient flow of casualties from the point of injury through the CCS
and onwards to a medical treatment facility requires careful
coordination by the SMC, the BMC and the CLO.
• The Casualty Loading Officer (CLO) is responsible for ensuring that
the right casualty is moved to the right medical facility in the right
timeframe. They must liaise regularly with the SMC to maintain
situational awareness of the receiving medical facilities.
• A range of transport platforms, both dedicated and improvised should
be considered according to their capacity, availability and suitability.
Detailed specification can be found in the CGOs transport section.
• The Incident log found in the reference section should be used for
casualty tracking. Casualty tracking is a critical process that ensures
casualties reach their correct destination and are accounted for.

Special situations

• The basic MIMMS principles, planning and execution
apply to all special situations. Applying an “all hazard”
approach to risk assessment, a subject matter expert
will advise on the necessary modifications required to
safeguard the responders. Follow the links below for
guidance on specific situations.
• HAZMAT
• CBRN
• Building collapse
• Road traffic collision
• IED
• IDF

First on scene

Command and Control
• Start a log and record time of arrival
• 4Cs - Confirm, Clear, Cordon and Control

Safety
• Prioritise Self – scene - survivors
• Confirm hazards and mitigate
• Consider appropriate PPE

Communication
• Send initial report
• Use a METHANE format
• Co-locate with other emergency services

Assess
• Assess the scene
• Consider location of command posts and
medical laydown

Notes
• Do NOT carry out any triage or treatment at this stage
• Continue to assess and communicate as details become
available
• Continue duties of the Commander until relieved


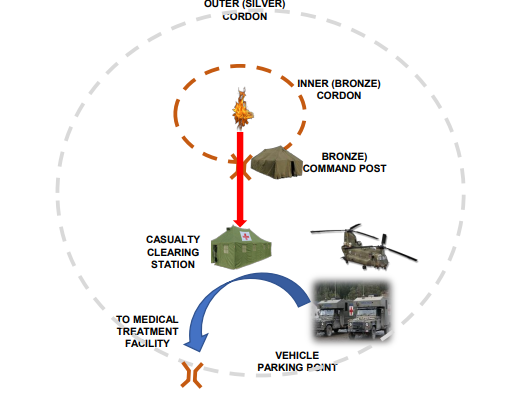
INCIDENT LAYOUT

Initial Scene Assessment

General Scene Assessment

Briefing for Duty

❑ Ground layout ( sketch where possible)
❑ Situational brief - what has happened
❑ Confirm chain of command (C2)
❑ Confirm tasks and sub-tasks
❑ Identify hazards, access and egress points,
evacuation procedure, PPE required
❑ Additional equipment required
❑ Communication plan
❑ Assessment – consider the medical resources
and infrastructure required (if relevant to task)
❑ Triage system (if relevant to task)
❑ Treatment plan (if relevant to task)
❑ Reporting procedure - who, when, where

Locating the CCS

❑ Ground – hard standing
❑ Building / permanent structure (protection)
❑ Life support (heat, light, water, sanitation)
❑ Upwind of potential airborne hazards
❑ Safe proximity from incident point
❑ Easy access and egress for evacuation
platforms (air/land/sea)

CCS LAYOUT


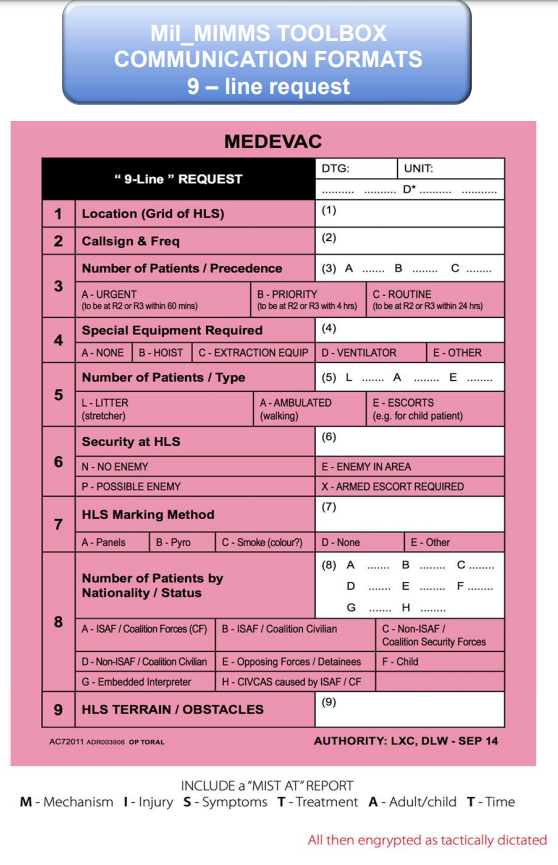
Communication Formats

Last reviewed: 18/03/2025

Next review date: 18/03/2026

References